

Notan Thumbnail Sketching: Light and Dark

A photograph captures everything. A notan thumbnail forces you to decide what actually matters before you paint a single stroke. Here’s how the technique works, on paper and in Photoshop.
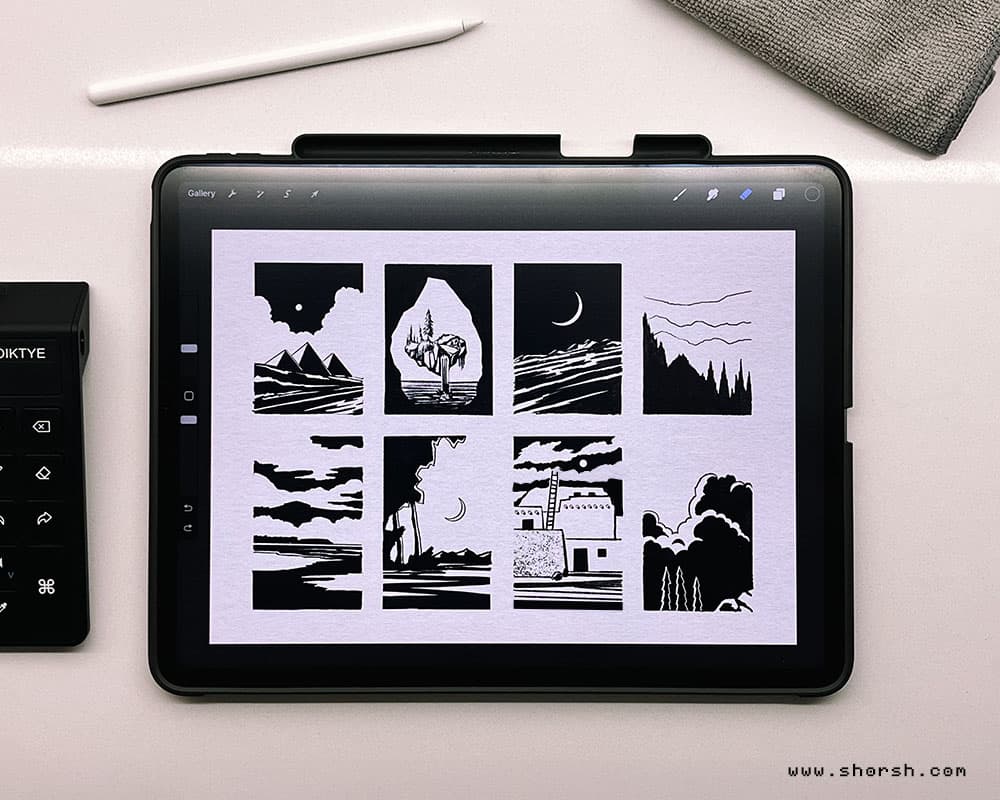
Notan thumbnail sketching is one of the tools I come back to most often before starting a piece. These small, fast studies, done with a pen, pencil, or brush, force a decision that a photograph never asks you to make: what actually matters in this scene, and what can disappear.
A photograph records everything indiscriminately. A notan thumbnail demands choice. It’s the artist’s decision-making made visible: taking the overwhelming detail of the real world and reducing it to a handful of shapes in black and white.
Why sketch when you could just take a photo
Thumbnails force you to decide what’s essential and cut everything else. That elimination is the actual first step of making a piece of art, not a preliminary chore before the real work starts. A photo shows you what’s there. A thumbnail shows you what you noticed.
What they’re actually for
Notan thumbnails work as memory aids and as planning tools. They capture the initial spark of interest in a scene, the reason it caught your eye in the first place, before that reason fades. They’re useful in museums too, as a way of studying a painting’s structure quickly. And because the first composition is rarely the best one, thumbnails let you test several options before committing to any of them.
How to make a notan thumbnail sketch
Start with whatever caught your attention: a word or two describing the feeling is often enough to hold onto. Draw a rough rectangle, block in the major shapes, and ignore details entirely. Squint at the reference until only the big shapes remain visible. Then commit: block the darkest areas in black, leave the lightest areas white, and let the sketch evolve as you refine it.
The goal isn’t accuracy. It’s capturing the relationships between shapes, the contrast, the mood, whatever made the scene worth noticing in the first place: fog around trees, the angle of light across a mountain, a specific kind of quiet.
Why the extra step is worth it
Skipping straight to a finished piece feels faster, but thumbnails save time overall. They let you solve composition problems while the cost of a mistake is still a thirty-second sketch, not hours of work. Every stroke in the final piece benefits from decisions already made at the thumbnail stage. And there’s something else: once the foundation is solid, you paint with more trust and a lot more joy. You’re not improvising the structure anymore. You’re just enjoying the process.
The idea behind notan thumbnail sketching
Notan comes from a Japanese design concept centered on the placement of light and dark values next to each other, translating three-dimensional form into a flat, two-dimensional pattern. Traditionally, artists worked this out in paint, ink, or cut paper, but the same logic applies directly to digital image-making. The principle hasn’t changed, only the tools have.
Making notan sketches digitally
You can build effective notan studies in Photoshop or Procreate. Start with a reference photo and convert it to grayscale. For a true two-value notan, use Threshold (Image > Adjustments > Threshold) and adjust the cutoff until the black and white shapes read clearly. Or, for a three-value version with a mid-tone gray, use Posterize. Adjusting curves beforehand lets you push the contrast around before committing to the cutoff. The digital version turns notan into something you can iterate on in seconds rather than minutes.
I still start most of my own projects with notan thumbnail sketching this way. A five-minute study has saved me from more bad compositions than I can count, and it costs almost nothing to discard if it doesn’t work.